The board
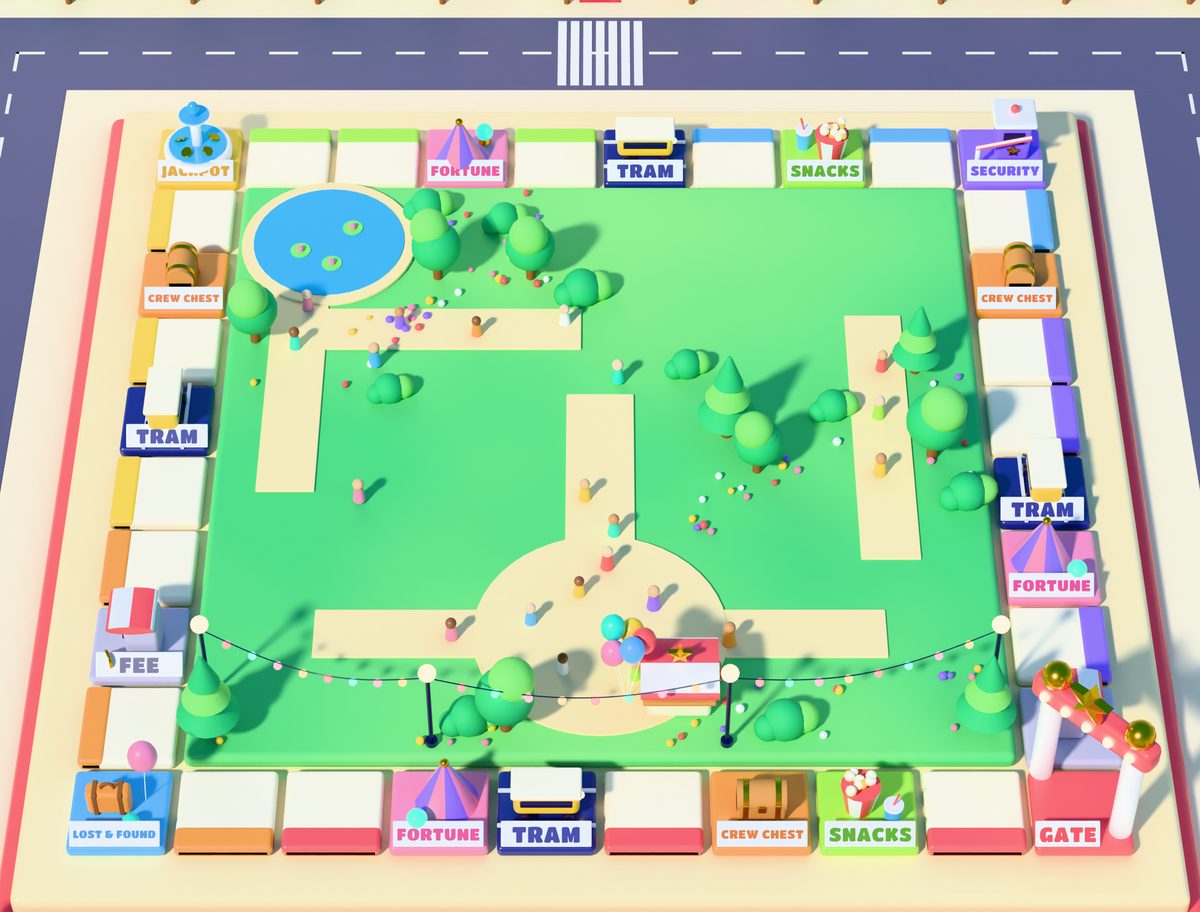
Every park has the same board: a loop of 36 spaces round the park, starting at the gate. Your token walks clockwise, along the front first. Special spaces have their names on white signs at their front edge; the plain coloured spaces are stall plots.
| Space | On the board | What landing on it does |
|---|---|---|
| Gate | 1 | Passing it (or stopping on it) pays a lap bonus in coins. |
| Stall plot | 18 | Pays coins and puts up a stall. A full zone spins the zone wheel. |
| Snack stand | 2 | Always pays coins. |
| Fortune teller | 3 | Rolls or coins at random, or a lost shield back. |
| Crew chest | 3 | A crew key, sometimes rolls too. |
| Tram | 4 | A prank or a heist in someone else's park. |
| Repair fee | 2 | Costs a few coins and tops up the jackpot fountain. |
| Jackpot fountain | 1 | Pays out everything in the fountain. |
| Park security | 1 | Roll doubles within three tries for a prize and stay here; otherwise go to Lost & Found. |
| Lost & Found | 1 | Nothing: just visiting. |
The coins and rolls a space pays are multiplied by your multiplier (a crew key is always just one), and coin amounts grow with each new park.
The gate
The gate is the arch on the first space. Every time your token passes it, you collect a lap bonus in coins ("Lap bonus!") without stopping. Landing exactly on the gate counts as passing it. On a Lap Dash event day, passing the gate also earns tickets.
Stall plots and the zone wheel
Half the board is stall plots. Every visit to a plot pays coins and puts up a stall, up to four stalls on each plot; the coins say so as they pop up, for example "Stall up! 2 of 4". A full plot keeps paying; it just doesn't take more stalls. Plots further round the board from the gate pay a little more, and a plot's tap card shows exactly what it pays now, for example "2 of 4 stalls up · pays 39 coins".
The plots are grouped into six zones of three plots each, in order round the board, and the stalls in a zone share a colour. When all three plots of a zone have four stalls, the zone is complete and the zone wheel spins ("Zone complete!"). It has 20 equal slices, so each slice is a 5% chance: 12 slices of coins (60%), 5 of 2 rolls (25%), 2 of 5 rolls (10%) and 1 sticker pack (5%). Where it stops is your prize (tap to skip the spin; on auto-roll it spins faster). Then that zone's stalls come down and you can fill it again.
The wheel's coin and roll prizes grow with the multiplier you used while putting the zone's twelve stalls up: fill a zone at x2 and its prize is about twice the x1 prize, and the "x2" shows on the wheel's middle when it stops. A sticker pack is always one pack.
Your stalls stay when you finish a park: the next park opens with them where they were, so a zone that was one stall from the wheel still is.
Snack stands
Marked SNACKS. A snack stand always pays coins, more than any stall plot.
Fortune teller
Marked FORTUNE. The fortune teller hands out rolls or coins, at random. Rolls come as 5 rolls (times your multiplier); coins come in a small, a bigger or a big fortune. If a prank has used up one of your shields, the fortune teller sometimes gives you one back instead ("+1 shield"), about one visit in four, until you have 3 again. The exact chances are on Prize odds.
Crew chests


Marked CREW CHEST. Every crew chest gives you one crew key, and one time in ten 4 rolls as well (times your multiplier). The key is always one, whatever your multiplier.
Tram
Marked TRAM. "All aboard!" The tram takes you to another park, where you either prank a ride or pull a heist for coins. See Pranks and heists.
Repair fee
Marked FEE. Even rides need fixing. A repair fee costs a few coins (times your multiplier), but never more than a tenth of the coins you have, so it can't empty your purse. With fewer than 10 coins there's nothing to take and the fee is waived. Every landing on a fee also tops up the jackpot fountain, even when the fee was waived, and by as much as your multiplier: a fee at x5 adds five times as much.
There are two fee spaces. The second one is the last space before the gate, and its sign is hidden behind the gate's arch.
On a Lucky Lap there's no fee at all, and nothing goes into the fountain.
Jackpot fountain
Marked JACKPOT, in the back left corner. Land here and the fountain pays out everything in it ("JACKPOT!"), whatever your multiplier: the multiplier counts when the fees fill it, not when it pays. Then it starts again from a small amount, and every landing on a repair fee tops it up. Tap the fountain to see what's in it now, for example "In it now: 150 coins".
The fountain is yours alone, and it keeps its coins when you move on to a new park.
Park security and Lost & Found
Marked SECURITY, in the back right corner. Uh oh, security! "Roll doubles in 3 tries for a reward." Bars rise around your piece when you land. Tap ROLL for each try (the button reads TRY 1 OF 3) and the dice are thrown beside your token, up to three times, looking for doubles. These throws are free: they don't use your rolls. They're drawn as you land, and the tries show them one by one; doubles come up within three tries 42.1% of the time (Prize odds). With auto-roll on, the tries throw by themselves.
- Doubles ("Doubles!", "Doubles bonus!"): the bars lower, security pays you coins and 3 rolls (both times your multiplier), and your piece stays on Security.
- No doubles ("Caught!"): you still get a few coins, a consolation prize, and move to Lost & Found before the bars lower.
Only three missed attempts send your token to Lost & Found in the front left corner. Lost & Found itself does nothing: landing on it, or being sent there, is just visiting.
Event tickets on spaces

Each day's event picks some kinds of space. Those spaces carry a yellow ticket marker, and landing on one collects its tickets, on top of what the space itself does. The ticket flies off, and that space stays empty until you pass the gate, when every collected ticket comes back. The tap card shows how many: "Today's event: +6 tickets here". See The daily event and tickets.
The board, space by space
Going round from the gate, in the order your token walks:
| Side | Spaces in order |
|---|---|
| Front, from the gate | Gate · plot · Snacks · Crew chest · plot · Tram · Fortune · plot · plot · Lost & Found (corner) |
| Left side, going back | plot · Fee · plot · plot · Tram · plot · Crew chest · plot · Jackpot (corner) |
| Back, going right | plot · plot · Fortune · plot · Tram · plot · Snacks · plot · Security (corner) |
| Right side, coming forward | plot · Crew chest · plot · plot · Tram · Fortune · plot · Fee, then the gate again |